Getting Started Guide: eFORMz Installation & Setup
This post introduces you to installing eFORMz, setting up a printer, and printing from one of the sample programs to your printer. To download eFORMz, go to the following page: eFORMz Download. View the following video for a tutorial: Download eFORMz
NOTE: to view the “Getting Started” video, please view the following: eFORMz Product Introduction: How to Access and Download eFORMz
Operating systems
eFORMz Version 11 runs on the following operating systems. This document is for the Windows operating system.
- IBM iSeries
- Linux
- Mac
- Unix
- Windows
eFORMz Installation: download and install eFORMz
- To download eFORMz, go to the following page: eFORMz Download.
- Complete the registration and license agreement.
- The installation program is password protected. Contact sales@minisoft.com to get the installation password.
- Click Register, and then click Full Install to start downloading.
- After the download completes, run the installation program. You might need to run the program as a system administrator, depending on your system’s configuration.
- Start the eFORMz Composer.
To install eFORMz to a drive other than C:, follow the procedure in Non-Default Drive.
Send eFORMz.xml license file
In the Minisoft\eFORMz_6 folder, locate the eFORMz.xml file and send it to Minisoft support for activation. For iSeries users, read the following post: License eFORMz on an AS/400 (iSeries) system.
Start the eFORMz Composer
After the installation program completes, you are prompted to start the Composer. The first time you start the Composer, the Minisoft License Activator starts. Complete the fields and click Activate. The Composer starts using a trial license.
-
-
- Open a sample project by clicking File > Open Project > select a project from C:\Minisoft\eFORMz_6\Projects\Sample.
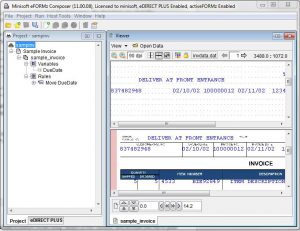
Sample Project Description sampchk.efz Check: 8.5” x 11” portrait sampinv.efz Invoice: 8.5” x 11” portrait samppo.efz Purchase order: 11” x 8.5” landscape with multiple forms sampstm.efz Statement: 8.5” X 11” portrait The following image shows the sample invoice project, sampinv.efz:

The Composer has three windows: Project, Viewer, and Variables. The Viewer shows the incoming data on the left, and the outgoing data after it is processed on the right. The bottom of the Viewer has a tab for each form in the project.
- Optionally, click Run > Output and enter a file name to create a PDF file from data in the project. Click Save, and the PDF file is created. On most systems, the PDF file automatically opens. Your system must have software installed that supports creating PDF files for this step. PDF files are useful during eFORMz project development. You can also create PDF files for eFORMz to automatically send as an email attachment or create a PDF archive. For example, you can email invoices to customers who have selected to receive emailed invoices and archive the PDF file in your file system. You can find information on these topics at support.minisoft.com.
- Open a sample project by clicking File > Open Project > select a project from C:\Minisoft\eFORMz_6\Projects\Sample.
-
Add and configure a printer
eFORMz gets a list of available printers from Windows.
-
-
- In Windows, open Devices and Printers and add your printer. The printer must be configured to use a Generic/Text Only driver.
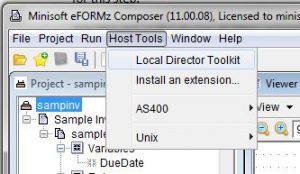
- In the Composer, click Host Tools > Local Director Toolkit. You can also double click the Director Toolkit icon on your Windows desktop.

- Click the Printers tab > Add. The Printer Configuration window opens. Click Add again.
- Click the ellipsis button at the top right. The Select Printer window opens. This is the printer list from Windows. Select the printer you added in Step 1 and click OK.

- In the Device field, type a name for this printer. This is a local name that is used only by eFORMz. Click OK.
- In the Name field, type a name for this printer. It can be the same name that you used in the previous step. The name in this step can be a pool of printers that you can refer to as one logical printer.
- Click the type of data to send to the printer. Most laser printers accept PCL (or Color PCL for color printers) and Postscript. Click OK.
- Click Save. Close the Director Toolkit.
-
Printing to a printer
Go back to the project you opened in the Composer to print it.
-
-
- Click Run > Print.
- Select the printer you configured.

- Click OK. Your invoice is sent to the printer.
-
Troubleshooting and other useful information is at support.minisoft.com. Many eFORMz videos are available on our YouTube and Vimeo channels.
Tags: eFORMz setup; eFORMz install; eFORMz installation
