
SATO GY412 Recommended Settings
Download PDF Instructions
PDF Instructions available here: https://minisoft.com/support/wp-content/uploads/2020/02/SATO-Guide-v2.pdf
Driver
eFORMz includes a built-in SATO printer driver. When you create the printer in Windows, use a Generic / Text Only printer driver to let data from eFORMz pass through unchanged.
Firmware
To limit troubleshooting and errors, Minisoft recommends the following changes for a stock SATO GY412 label printer.
Some SATO printers are shipped with older firmware. Obtain and install the latest firmware using SATO’s All-In-One printer utility found here:
https://www.satoamerica.com/resource-library/all-in-one-printer-utility.aspx
Note – The latest firmware instructions include:
-No interface cables plugged in during upgrade. (USB, Network, etc.)
-Hold down the ENTER, DOWN ARROW, and FUNCTION button on power.
-Holding down the ENTER, DOWN ARROW, and FUNCTION button on power will then prompt you to select interface or SD card. Choose the SD card option and upgrading will start.
Any issues?
Any issues with the All-In-One Printer Utility and/or obtaining newer firmware should be directed to SATO support here:
https://www.satoamerica.com/master-form.aspx
Batch Settings
The GY412’s default settings cause various issues when working with batches of 2ST labels.
The following settings need to be changed:
PRINTER TYPE needs to be set to CONTINUOUS instead of TEAR OFF.
SENSOR TYPE needs to be set to I-MARK instead of GAP.
To make these changes, navigate to ADVANCED mode on your SATO GY412 and make the proper changes.
1. Set the printer to OFFLINE mode by pressing and holding the LINE button for 1 second and releasing.
2. Press ENTER and use the arrow keys to select the wrench and hammer icon for ADVANCED mode.
3. Press ENTER until you reach PRINTER TYPE and change the setting to CONTINUOUS.
4. Keep pressing ENTER until you reach SENSOR TYPE and change the setting to I-MARK.
5. Hit enter 1 more time to save the setting then use the FUNCTION button to exit out of the menus.
6. Set the printer back to ONLINE mode by pressing and holding the LINE button for 1 second and releasing.
Printing Configuration Settings
To print out the current printer configuration do the following:
1. Turn OFF the printer.
2. Press and hold the [FEED] button down and turn the printer ON. This will place the printer in TEST PRINT MODE. Make sure you have at least two labels fed into the printer.
3. Press ENTER until you reach PITCH POSITION.
4. Press ENTER to begin printing.
5. Press ENTER again immediately to stop the printing process. The current label will finish printing.
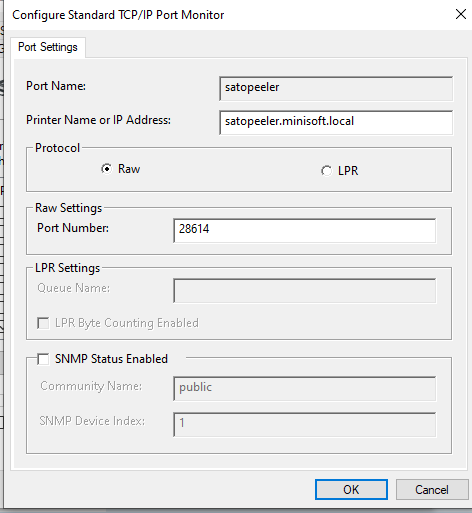
Port Settings
One of the potential causes of the GY-412 offline error is PCL data arriving on the SBPL port. Using a more obscure port, such as 28614, can be used from any operating system and will limit the number of connections from systems that can interfere with the printer. This will prevent systems expecting laser printers from sending PCL.
Additional Settings in eFORMz
Two-sided labels: To print two-sided thermal labels from your SATO GY412 printer, you must use two-sided thermal stock. You must also add the printer to eFORMz and add two options in the Printer Configuration window:
- In the Printer Configuration window’s Printer options section, click Add.
- Set Duplex enabled to Yes, and click OK.
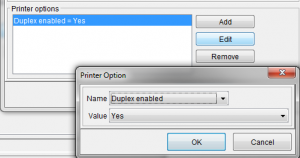
- Save your printer configuration.
Improved batch performance: Thermal printers have limited memory. As a result, large batches that overwhelm the printer’s memory can have unpredictable results. Setting the following option will eliminate most batch-related problems:
- In the Printer Configuration window’s Printer options section, click Add.
- Set Send As Binary to Yes, and click OK.
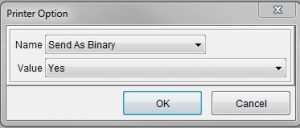
- Save your printer configuration.
Print in the right direction: There are a few versions of the DuplexPackSlip label. The placement of the tear strip can vary. In some cases, using the inverted 4×8 media type to print in the right direction is recommended. (Project Properties > Printer Control)
