
Processing JSON Data in eFORMz Projects [JSON to XML conversion]
NOTE: To convert JSON to XML using the JSON Preprocessor, view the following tutorial: https://vimeopro.com/user39510018/minisoft-support/video/686417060
JSON files are a good way to provide data to eFORMz if you cannot provide XML files. This post presents the most common way of handling JSON–Converting JSON to XML. JSON uses name-value pairs. Converting JSON to XML makes the names variables. The same structure is preserved. Because of the way eFORMz processes JSON data, the names must follow the rules for XML elements. For example, names must be alphanumeric and not numeric only. For example the following JSON:
{"Data":
{ "SoldTo": "Dr Emmett Brown",
  "SoldPhone": "800-682-0200",
  "CustPO": "88MPH",
  "ShipDate": "06/12/17",
  "PackSlip": "4561801",
  "OrderNum": "O597234",
"Lines": [
{ "LineNo": "1", "PartNum": "070194006", "Description": "GSKT COUPLING 8", "Qty": 2, "UOM": "EACH" },
{ "LineNo": "2", "PartNum": "735040334", "Description": "VLV CHECK", "Qty": 1, "UOM": "EACH" },
{ "LineNo": "3", "PartNum": "070199008", "Description": "GSKT FLAT .03THK X 7.75 OD", "Qty": 2, "UOM": "EACH" },
{ "LineNo": "4", "PartNum": "330704104", "Description": "SEAL WHL EYE 063CE IMPELLER SEAL", "Qty": 1, "UOM": "EACH" },
] } }
Is converted to the following XML:
<Data>
<SoldTo>Dr Emmett Brown</SoldTo>
<SoldPhone>800-682-0200</SoldPhone>
<OrderNum>O597234</OrderNum>
<CustPO>88MPH</CustPO>
<ShipDate>06/12/17</ShipDate>
<PackSlip>4561801</PackSlip>
<Lines>
<UOM>EACH</UOM><Description>GSKT COUPLING 8</Description><PartNum>070194006</PartNum><Qty>2</Qty><LineNo>1</LineNo>
</Lines><Lines>
<UOM>EACH</UOM><Description>VLV CHECK</Description><PartNum>735040334</PartNum><Qty>1</Qty><LineNo>2</LineNo>
</Lines><Lines>
<UOM>EACH</UOM><Description>GSKT FLAT .03THK X 7.75 OD</Description><PartNum>070199008</PartNum><Qty>2</Qty><LineNo>3</LineNo>
</Lines><Lines>
<UOM>EACH</UOM><Description>SEAL WHL EYE 063CE IMPELLER SEAL</Description><PartNum>330704104</PartNum><Qty>1</Qty><LineNo>4</LineNo>
</Lines></Data>
After you have valid JSON data as the input data for the form, complete the following steps to assign the data to variables:
- Create a variable to hold the JSON.
- Right click the variable > Function > Set value > Raw Page Data. The value of the variable is now the content of the JSON file.
- Right click the variable > Function > Add Advanced Function > JSON to XML. Now the variable contains XML of the same data.
- Create a variable for each XML variable whose value you want to use in the form.
- For each XML variable, create a pre-condition Load from XML procedure. You can use a post-condition procedure if you have a condition on the form that must be first evaluated, but pre-condition procedures are more efficient.
- In the Load from XML window, click From variable and select the variable you created in Step 1.
- In Data Node, type the XML node that contains the variable’s value.
- In the Variable field, select the variable to assign the value to. This is a variable you created in Step 4:
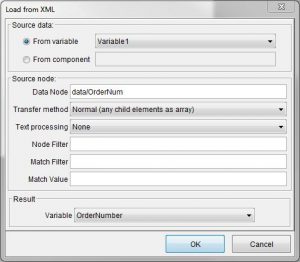
- Click OK and repeat for each XML variable.
Now your JSON data is assigned to eFORMz variables that you can place on a form.