Installing and running eFORMz on Amazon Web Services (AWS) Linux EC2 instance
In order to connect to an AWS Linux EC2, you will need a few things:
- Private key file
- Instance Public DNS
- eFORMz 11.02.12 or newer installed on a Windows machine
This information can be found by going to your AWS page and going to EC2 -> Running instances and right clicking on the instance that you want to install eFORMz on. Click connect. There will be a pop up with all of the information that you need.
Once you have these things, put your private key file somewhere in your Minisoft/eFORMz_6 directory. In our example, it’s in a directory called AWS (Minisoft/eFORMz_6/AWS). Open the composer, go to Host Tools -> Unix -> Install eFORMz…
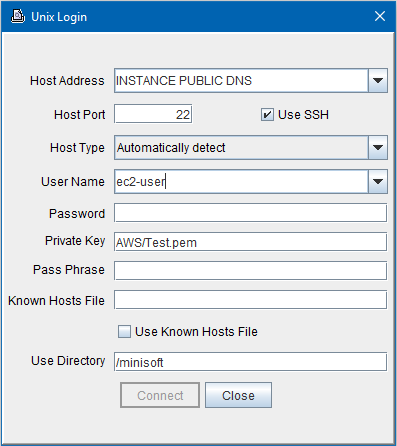
You should see a page like this:

Make sure to select the “Use SSH” check box.
The host address will be your instances public DNS
The private key will be the path to the private key file. This path is relative to where it is in the eFORMz_6 directory.
The user name will probably be “ec2-user”. If it is something else, please enter it instead of “ec2-user”.
Once you have entered all this information, click connect. The rest of the process is a normal eFORMz linux install. The instructions for this can be found here: Linux Install
Once the installation is complete you will need to check that Java is installed on the box. You can use Putty to connect into your EC2. Once you have done this, run the command “java -version”. Java 8 or above is recommended. If Java is not installed you can install it by running the command “sudo yum install java-1.8.0”.
Once Java has been installed, you will need to start the eFORMz service on the box. Instructions to do this can be found here: https://minisoft.com/support/index.php/starting-eformz-service-on-a-linux-machine/
NOTE: In order to view the Director tab in the Director Toolkit you will need to use a tunnel.
