
Director Alerts
eFORMz Version 10.5 or later
Download Available Files – Alerts
Starting in eFORMz Version 11.02, you can configure alert limits. For more information, see Customizing Director Alert Limits.
Alert System for the Director
eFORMz can monitor for exceptions encountered during processing, and move the associated input file to a quarantine directory, as well as performing other actions, such as:
- Send an email notifying of the exception.
- Print a report listing the exception, the file being processed, and other information.
Alert processing is enabled at the Director Toolkit configuration file level. If alert processing is not defined for a configuration file, any input queue defined therein could get stuck retrying an input file again and again, using up processor time and resources unnecessarily. Therefore, we strongly recommend that each configuration file have alert processing enabled. Note that if you have multiple configuration files, you must define Alert processing for each one.
How to Configure Alerts
A sample “Install an extension” ZIP file can be downloaded using the link at the top of this page. [AlertsSample.zip]
Download this ZIP file to a location from which you will install it, but do not unzip it. To install the sample, run eFORMz Composer, select “Host Tools > Install an extension…”, navigate to the place you saved the ZIP file, select it and click Open, then follow the prompts until you see the “Installation Complete” message, then click Done. Close the Composer.
Configuring the Sample Alert Configuration
The sample provides the Director Toolkit configuration file, a sample project to trigger an alert, and a sample project to handle that alert. To run the sample, you will need to configure eFORMz to use the Director Toolkit configuration file (AlertsTest.cfg) provided with the sample, following these steps:
- Click the Windows Start menu.
- Find the eFORMz 11 folder and click to open it.
- Click the “Director Configure” item. If prompted “Do you want to allow this app from an unknown publisher to make changes to your device?” answer Yes.
- Click “Configure Startup Parameters”.
- Type the following into the Startup Parameters field:
projects/AlertsTest/AlertsTest.cfg - Click OK
- Click Exit
- Answer Yes when prompted to save changes.
Tour of Alert Configuration
To assist in understanding how alert processing works, this section walks through the sample project and configuration installed in the previous section:
- Create an eFORMz project to accept the eFORMz XML Alert Format (EXAF), defined below. This project can send an email or perform other actions in response to an alert and will need to define global variables that are returned to the Director to move the input file or spool file. The sample project “projects/Alerts/Alerts.efz” is such a project.
- This project needs to define some eDirect output.
- In the Director Toolkit, open the “projects/AlertsTest/AlertsTest.cfg” configuration file. Note the AlertsQueue queue that accepts input files XML files (in EXAF format) and calls the project defined in step 1.
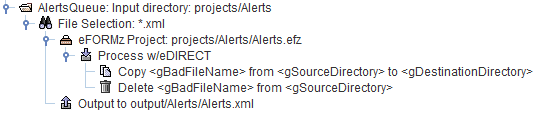
-
- The File Selection should be set to “*.xml”, even though there is not really a file. The Director creates the XML in memory and calls the project with it, as if it was an input file. The Disposition is set to “Delete selected file”, but we keep a copy of the XML file in another directory with the “Output to output/Alerts/Alerts.xml” directive.
- Right-click on the project line, then select “Add Output Process > Process w/eDIRECT PLUS…” Enter “output” for the Base Directory, then check the “Disable standard subdirectories” checkbox.
- Right-click on the “Process w/eDIRECT” node, and add OS-specific commands to move the input file or input spool file so that it is not processed again.
Note: If you process different types of input that cannot be operated on (moved or put in hold status, etc.) by the same commands, you will need to separate the Director queues processing these different types of input into separate Director Toolkit configuration files. Then you can define an alert queue in each of these configuration files that will process the errant input file in the correct way.
Note 2: The example above shows a Windows configuration file with Windows-specific file operations to move (by copying and then deleting) the input file.
- In the Director Toolkit, right-click on the root node, and select “Alerts…” to display the Alerts Configuration dialog box:
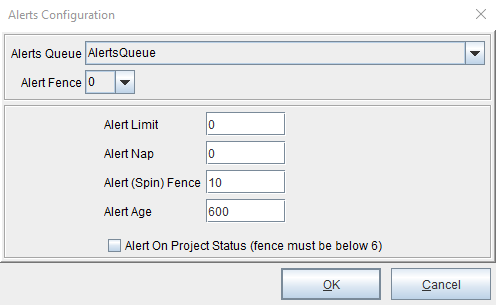
In the “Alerts Queue” dropdown, select the desired queue, “AlertsQueue” in this case. Set the Alert Fence to one of the values in the dropdown, which are numbers from 0 to 16. If an alert (processing exception) with a priority higher than the fence occurs, the alert will be triggered. - Configure the other values: Alert Limit, Alert Nap, Alert (Spin) Fence, and Alert Age. These values allow you to fine-tune when a processing queue will be stopped because too many alerts happened in a certain time period. They are documented on this page: Customizing Director Alert Limits
- The other queue defined in this configuration, named “Sample”, simply triggers an alert:

-
- The details of how the sample alert is triggered aren’t that important – the main thing is that it demonstrates a project triggering an alert, and shows how the alert is handled. However, for the A students, here are the details:
- The alert is triggered because the “Output to projects/AlertsTest/Output/test.pdf” output option under the project call to “projects/AlertsTest/MakeBadFileName.efz” specifies a directory that does not exist.
- The details of how the sample alert is triggered aren’t that important – the main thing is that it demonstrates a project triggering an alert, and shows how the alert is handled. However, for the A students, here are the details:
Alert Processing Review
Let us review what happens in the processing of an alert in the sample project:
- When you copy the sample input file invdata-throwerror.dat into the “projects/AlertsTest/Input” directory, it is picked up by the Sample queue and passed to the “projects/AlertsTest/MakeBadFileName.efz” project.
- The project processes the file, produces some output, and returns to the Director.
- The Director attempts to write the output from the project to the file “projects/AlertsTest/Output/test.pdf”.
- Since the Output directory does not exist, this causes an alert to be triggered.
- The Director gathers up all the information about the queue, the project that processed the input file, and the input file, puts it in an XML packet in the EXAF format, and calls the defined Alerts Queue, Sample, which calls the “projects/Alerts/Alerts.efz” project. This project sends out an email, and defines three global variables that are passed back to the Director:
- gBadFileName
- gDestinationDirectory
- gSourceDirectory
- The Director uses these three Queue Monitor variables to copy the errant input file to the directory specified by gDestinationDirectory, and then delete the file from the directory specified by gSourceDirectory.
- A copy of the Alert XML file is saved to the “output/Alerts” directory with the name “Alerts.xml”, and because the “Create unique filename” checkbox is checked, a timestamp is added to the filename before the “.xml” extension.
- We’re done.
eFORMz XML Alert Format (EXAF)
When the Director encounters an exception in a queue, it gathers information about the current processing state of that queue and formats it into an XML package that is passed to the configured Alert queue project. This format differs slightly depending on the environment in which eFORMz is running: Windows, AS400/iSeries, Linux, etc. Below is a sample XML package for Windows:
<?xml version="1.0" encoding="utf-8"?>
<Alert Priority="15" Timestamp="1588032397527">
  <Source><![CDATA[Queue Monitor Sample for projects/Alerts/Input]]></Source>
  <PrimaryMessages>
    <PrimaryMessage><![CDATA[File output error]]></PrimaryMessage>
    <PrimaryMessage><![CDATA[  C:\\Minisoft\\eFORMz_6\\projects\\Alerts\\Output\\test.pdf.hld (The system cannot find the path specified)]]></PrimaryMessage>
  </PrimaryMessages>
  <SecondaryMessages>
    <SecondaryMessage><![CDATA[java.base/java.io.FileOutputStream.open0(Native Method)]]></SecondaryMessage>
    <SecondaryMessage><![CDATA[java.base/java.io.FileOutputStream.open(FileOutputStream.java:292)]]>
    </SecondaryMessage>
    <SecondaryMessage><![CDATA[java.base/java.io.FileOutputStream.<init>(FileOutputStream.java:235)]]>
    </SecondaryMessage>
    [...other SecondaryMessage nodes showing the call stack...]
  </SecondaryMessages>
  <DataValues>
    <DataValue>
      <Name><![CDATA[datafilename]]></Name>
      <Value><![CDATA[invdata-throwerror]]></Value>
    </DataValue>
    <DataValue>
      <Name><![CDATA[datafiletype]]></Name>
      <Value><![CDATA[PCL]]></Value>
    </DataValue>
    <DataValue>
      <Name><![CDATA[project]]></Name>
      <Value><![CDATA[MakeBadFileName]]></Value>
    </DataValue>
    <DataValue>
      <Name><![CDATA[datafileext]]></Name>
      <Value><![CDATA[dat]]></Value>
    </DataValue>
    <DataValue>
      <Name><![CDATA[directory]]></Name>
      <Value><![CDATA[projects/Alerts/Input]]></Value>
    </DataValue>
  </DataValues>
</Alert>
The XML contains the following information about the exception:
- Priority – a number from 0 – 15 with a higher number being more severe.
- Timestamp – a Java timestamp from the time the exception occurred. This is the number of milliseconds since January 1, 1970 00:00:00 GMT. This can be converted to a human-readable date and time using the Date Format action in eFORMz.
- Source – a phrase containing the name of the Queue Monitor and the input source being monitored. “Queue Monitor <queuename> for <inputsource>”, where <queuename> is the name of the Director Queue, and <inputsource> is the input directory or OUTQ or other input source.
- PrimaryMessages – a list of the one or two primary messages indicating the cause of the error.
- SecondaryMessages – the call stack from the exception, giving additional information that may be helpful to Minisoft in pinpointing the cause of the exception.
- DataValues – a list of the predefined Queue Monitor variables in effect at the time of the exception. Each variable is contained in a DataValue node.
- Each DataValue node contains two subnodes.
- Name – the name of the variable
- Value – the value of the variable at the time of the exception
- The following variable names are always defined:
- datafilename – the base part of the data file name
- datafileext – the extension of the data file name
- datafiletype – the format of the data file, one of the eFORMz recognized formats, such as PCL, ZPL, PDF, PNG, XML, etc.
- directory – the directory being monitored by the Queue Monitor
- project – the project in whose context the exception occurred
- The following additional variable names are defined in an iSeries (AS400) environment, and allow access to various attributes of the spool file:
- queue – the name of the Output Queue (OUTQ) being monitored
- iSeries_AUX_POOL – the value of the Auxiliary Storage attribute
- iSeries_COPIES – the value of the Copies attribute
- iSeries_FILENUMBER – the value of the Spooled File Number attribute
- iSeries_FORMTYPE – the value of the Form Type attribute
- iSeries_JOBNAME – the value of the Job Name attribute
- iSeries_JOBNUMBER – the value of the Job Number attribute
- iSeries_JOBUSER – the value of the Job User attribute
- iSeries_SAVE – the value of the Save Spooled File attribute
- iSeries_SPFNAME – the value of the Spooled File Name attribute (same as datafilename)
- iSeries_SPLFSTATUS – the value of the Spooled File Status attribute
- iSeries_USERDATA – the value of the User Data attribute
- iSeries_USERDEFDATA – the value of the User Defined Data attribute
- Each DataValue node contains two subnodes.
The variables in the DataValue nodes can be used to construct Global Variables with the “Pass last value to Queue Monitor” to pass back to the Director.